
CNC-Portalfräse: Unterschied zwischen den Versionen
Adnc (Diskussion | Beiträge) (→Workflow) |
Adnc (Diskussion | Beiträge) (→Steuern des Smoothieboards) |
||
| Zeile 355: | Zeile 355: | ||
* Mittlerweile existiert sogar eine Android App [https://gitlab.com/damfle/SmoothieControl SmoothieControl] | * Mittlerweile existiert sogar eine Android App [https://gitlab.com/damfle/SmoothieControl SmoothieControl] | ||
| + | * [https://github.com/vlachoudis/bCNC bCNC] ermöglicht das Senden von GCODE-Anweisungen und Visualisierung der Fräsbahnen in einer GUI. | ||
== Weblinks == | == Weblinks == | ||
Version vom 9. Juni 2016, 06:20 Uhr
| CNC-Portalfräse | |
|---|---|
 erste Inbetriebnahme, noch auf dem Frickelraumtisch | |
| Beschreibung: | CNC-Fräse |
| Ort: | Werkstatt |
| Status: | work in progress (Was heißt das?) |
| Kontakt: | comawill, adnc, Kasalehlia, larsan |
| Usage Policy: | Benutzung erst nach Einweisung. Kaputtmachen und Reparieren nur von Spezialexperten. |
Diese Seite befindet im Aufbau, es können Platzhalter vorkommen und wichtige Informationen fehlen. Inhaltliche Bearbeitungen und Ergänzungen, sowie Formatierungen sind ausdrücklich erwünscht.
Uns wurde am 28.03.2014 eine CNC-Maschine überlassen. Nachdem wir sie unter Verwendung des mitgelieferten Industrierechners ansteuern konnten, stellten wir fest, dass diese Methode nicht viel Zukunft haben würde. Kein USB, beschränkte Geschwindigkeit, laut, Win98 will man nicht im Netzwerk haben, etc.
Da die Fräse alle ihre Anschlüsse über D-Sub-Buchsen herausführt, wollen wir einen anderen Controller verwenden, der die Motoren direkt ansteuert. Am 24.05.2014 haben wir mit einem Smoothieboard erfolgreich die ersten Schritte in diese Richtung gemacht.
Stand 27.06.2014: Wir haben uns ein eigenes Smoothieboard 5X zugelegt, das wird derzeit in Betrieb genommen.
Inhaltsverzeichnis
Überblick
Fräse
Es handelt sich um eine etwa 15 jahre alte Isel Automation Flachbett Tischfräse CNC Multi K. Kaum gebraucht und vermutlich seit ~9 Jahren nicht mehr in Betrieb gewesen.
- Arbeitsbereich: 330*500*90 mm
- Kugelgewindetriebe
- Zwei Endschalter pro Achse
- Derzeit zwei Frässpindeln verfügbar
Hochfrequenzspindel- Proxxon
- Kress
- NEMA23 Schrittmotoren der Firma Nanotec 4T5618M3300
Motoranschlüsse an der Fräse
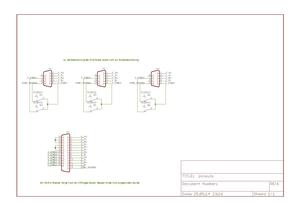
Die Fräse führt an der Hinterseite 3 D-Sub DE-9 Buchsen heraus, die je für die Ansteuerung der X-, Y- und Z-Achse zwei Polepaaranschlüsse bereitstellt. Pinbelegung D-Sub DE-9 Buchsen
1. Pol A
2. Pol /A
3. Pol B
4. Pol /B
5.
6.
7.
8.
9.
In der Fräse selbst steckt keine Logik, die Achsen werden über drei D-Sub-Buchsen aus der Fräse herausgeführt.
Endschalter
- X-Achse: Endschalter für min. und max. sind vorhanden
- Y-Achse: Endschalter für min. und max. sind vorhanden
- Z-Achse: Endschalter für min. und max. sind vorhanden
Die Entschalter mit NC (Normally Connected) an den jeweiligen D-Sub DE-9 Buchsen mit den Pins 5 (Common), 7 und 9 angeschlossen. Auf dem 25-Pol Kabel ist allerdings Pin 9 Common. Das sollte sich durch umlöten der Stecker an der CNC-Fräse aber ändern lassen.
Werkzeuge
Proxxon
- 230V, 100W
- 20k 1/min direkt am Gerät stufenlos verstellbar
- Wird direkt an den Rechner angeschlossen
- Mit Aufnahmen für verschiedene Einsatz-Durchmesser bis 3.2 mm
- Das vordere Lager wurde durch Proxxon kostenlos getauscht und ist somit wieder i.O.
HF-Spindel
- Wird von einem externen Netzteil mit Strom versorgt, das wiederum über "Fußpedal"-Anschluss mit Rechner ("HF-Spindel") verbunden wird. (Kann kurzgeschlossen werden, die Spindel ohne den Rechner zu betreiben.
- 50k 1/min
Werkzeug-Einsätze
- Siehe Bilder
- Als Beispiel könnten diese Spannpratzen dienen.
Misc
- Produktnr. 148508
- Ident 9911 00042
Erste Experimente

- Anschluss an ein SmoothieBoard
- Config angepasst (Siehe Upload von larsan)
- Mit Eagle und pcb-gcode gcode erzeugt, auf SmoothieBoard übertragen und ausgeführt
- Noch einige Probleme mit der Einstellung der Höhe(Z-Achse), da der Kleber unter der Platine etwas uneben war
Smoothieboard config

Eine erste config fürs Smoothieboard, liegt als config im Rootverzeichnis der µSD-Karte:
# NOTE Lines must not exceed 132 characters
# Robot module configurations : general handling of movement G-codes and slicing into moves
default_feed_rate 200 # Default rate ( mm/minute ) for G1/G2/G3 moves
default_seek_rate 600 # Default rate ( mm/minute ) for G0 moves
mm_per_arc_segment 0.5 # Arcs are cut into segments ( lines ), this is the length for
# these segments. Smaller values mean more resolution,
# higher values mean faster computation
mm_per_line_segment 5 # Lines can be cut into segments ( not usefull with cartesian
# coordinates robots ).
# Arm solution configuration : Cartesian robot. Translates mm positions into stepper positions
alpha_steps_per_mm 800 # Steps per mm for alpha stepper
beta_steps_per_mm 800 # Steps per mm for beta stepper
gamma_steps_per_mm 800 # Steps per mm for gamma stepper
# Planner module configuration : Look-ahead and acceleration configuration
planner_queue_size 32 # DO NOT CHANGE THIS UNLESS YOU KNOW EXACTLY WHAT YOU ARE DOING
acceleration 500 # Acceleration in mm/second/second.
acceleration_ticks_per_second 1000 # Number of times per second the speed is updated
junction_deviation 0.05 # Similar to the old "max_jerk", in millimeters,
# see https://github.com/grbl/grbl/blob/master/planner.c#L409
# and https://github.com/grbl/grbl/wiki/Configuring-Grbl-v0.8
# Lower values mean being more careful, higher values means being
# faster and have more jerk
#minimum_planner_speed 0.0 # sets the minimum planner speed in mm/sec
# Stepper module configuration
microseconds_per_step_pulse 1 # Duration of step pulses to stepper drivers, in microseconds
minimum_steps_per_minute 1200 # Never step slower than this
base_stepping_frequency 100000 # Base frequency for stepping, higher gives smoother movement
# Cartesian axis speed limits
x_axis_max_speed 1500 # mm/min
y_axis_max_speed 1500 # mm/min
z_axis_max_speed 300 # mm/min
# Stepper module pins ( ports, and pin numbers, appending "!" to the number will invert a pin )
alpha_step_pin 2.0 # Pin for alpha stepper step signal
alpha_dir_pin 0.5 # Pin for alpha stepper direction
alpha_en_pin 0.4 # Pin for alpha enable pin
alpha_current 1.0 # X stepper motor current
alpha_max_rate 1500.0 # mm/min
beta_step_pin 2.1 # Pin for beta stepper step signal
beta_dir_pin 0.11 # Pin for beta stepper direction
beta_en_pin 0.10 # Pin for beta enable
beta_current 1.0 # Y stepper motor current
beta_max_rate 1500.0 # mm/min
gamma_step_pin 2.2 # Pin for gamma stepper step signal
gamma_dir_pin 0.20 # Pin for gamma stepper direction
gamma_en_pin 0.19 # Pin for gamma enable
gamma_current 1.0 # Z stepper motor current
gamma_max_rate 300.0 # mm/min
# Serial communications configuration ( baud rate default to 9600 if undefined )
uart0.baud_rate 115200 # Baud rate for the default hardware serial port
second_usb_serial_enable false # This enables a second usb serial port (to have both pronterface
# and a terminal connected)
#leds_disable true # disable using leds after config loaded
# Extruder module configuration
extruder_module_enable true # Whether to activate the extruder module at all. All configuration
# is ignored if false
extruder_steps_per_mm 140 # Steps per mm for extruder stepper
extruder_default_feed_rate 600 # Default rate ( mm/minute ) for moves where only the extruder moves
extruder_acceleration 500 # Acceleration for retracts, mm/sec^2
extruder_max_speed 1000 # mm/sec NOTE only used for retracts
extruder_step_pin 2.3 # Pin for extruder step signal
extruder_dir_pin 0.22 # Pin for extruder dir signal
extruder_en_pin 0.21 # Pin for extruder enable signal
delta_current 1.5 # Extruder stepper motor current
# Laser module configuration
laser_module_enable false # Whether to activate the laser module at all. All configuration is
# ignored if false.
#laser_module_pin 2.5 # this pin will be PWMed to control the laser. Only P2.0 - P2.5
# can be used since laser requires hardware PWM
#laser_module_max_power 0.8 # this is the maximum duty cycle that will be applied to the laser
#laser_module_tickle_power 0.0 # this duty cycle will be used for travel moves to keep the laser
# active without actually burning
#laser_module_pwm_period 20 # this sets the pwm frequency as the period in microseconds
# Hotend temperature control configuration
temperature_control.hotend.enable true # Whether to activate this ( "hotend" ) module at all.
# All configuration is ignored if false.
temperature_control.hotend.thermistor_pin 0.23 # Pin for the thermistor to read
temperature_control.hotend.heater_pin 2.7 # Pin that controls the heater
temperature_control.hotend.thermistor EPCOS100K # see src/modules/tools/temperaturecontrol/TemperatureControl.cpp:64
# for a list of valid thermistor names
temperature_control.hotend.set_m_code 104 #
temperature_control.hotend.set_and_wait_m_code 109 #
temperature_control.hotend.designator T #
#temperature_control.hotend.p_factor 13.7 # permanenetly set the PID values after an auto pid
#temperature_control.hotend.i_factor 0.097 #
#temperature_control.hotend.d_factor 24 #
#temperature_control.hotend.max_pwm 64 # max pwm, 64 is a good value if driving a 12v resistor with 24v.
temperature_control.bed.enable true #
temperature_control.bed.thermistor_pin 0.24 #
temperature_control.bed.heater_pin 2.5 #
temperature_control.bed.thermistor Honeywell100K # see src/modules/tools/temperaturecontrol/TemperatureControl.cpp:64
# for a list of valid thermistor names
temperature_control.bed.set_m_code 140 #
temperature_control.bed.set_and_wait_m_code 190 #
temperature_control.bed.designator B #
#temperature_control.bed.bang_bang false # set to true to use bang bang control rather than PID
#temperature_control.bed.hysteresis 2.0 # set to the temperature in degrees C to use as hysteresis
# when using bang bang
# Switch module for fan control
switch.fan.enable true #
switch.fan.input_on_command M106 #
switch.fan.input_off_command M107 #
switch.fan.output_pin 2.6 #
switch.fan.output_type pwm # pwm output settable with S parameter in the input_on_comand
#switch.fan.max_pwm 255 # set max pwm for the pin default is 255
#switch.misc.enable true #
#switch.misc.input_on_command M42 #
#switch.misc.input_off_command M43 #
#switch.misc.output_pin 2.4 #
#switch.misc.output_type digital # just an on or off pin
# Switch module for spindle control
#switch.spindle.enable false #
# Endstops
endstops_enable true # the endstop module is enabled by default and can be disabled here
#corexy_homing false # set to true if homing on a hbit or corexy
alpha_min_endstop 1.24^ # add a ! to invert if endstop is NO connected to ground
alpha_max_endstop 1.25^ #
alpha_homing_direction home_to_min # or set to home_to_max and set alpha_max
alpha_min 0 # this gets loaded after homing when home_to_min is set
alpha_max 200 # this gets loaded after homing when home_to_max is set
beta_min_endstop 1.26^ #
beta_max_endstop 1.27^ #
beta_homing_direction home_to_min #
beta_min 0 #
beta_max 200 #
gamma_min_endstop 1.28^ #
gamma_max_endstop 1.29^ #
gamma_homing_direction home_to_min #
gamma_min 0 #
gamma_max 200 #
alpha_fast_homing_rate_mm_s 50 # feedrates in mm/second
beta_fast_homing_rate_mm_s 50 # "
gamma_fast_homing_rate_mm_s 4 # "
alpha_slow_homing_rate_mm_s 25 # "
beta_slow_homing_rate_mm_s 25 # "
gamma_slow_homing_rate_mm_s 2 # "
alpha_homing_retract_mm 5 # distance in mm
beta_homing_retract_mm 5 # "
gamma_homing_retract_mm 1 # "
#endstop_debounce_count 100 # uncomment if you get noise on your endstops
# Pause button
pause_button_enable true #
# Panel
panel.enable false # set to true to enable the panel code
panel.lcd smoothiepanel # set type of panel
panel.encoder_a_pin 3.25!^ # encoder pin
panel.encoder_b_pin 3.26!^ # encoder pin
# Example for reprap discount GLCD
# on glcd EXP1 is to left and EXP2 is to right, pin 1 is bottom left, pin 2 is top left etc.
# +5v is EXP1 pin 10, Gnd is EXP1 pin 9
#panel.lcd reprap_discount_glcd #
#panel.spi_channel 0 # spi channel to use ; GLCD EXP1 Pins 3,5 (MOSI, SCLK)
#panel.spi_cs_pin 0.16 # spi chip select ; GLCD EXP1 Pin 4
#panel.encoder_a_pin 3.25!^ # encoder pin ; GLCD EXP2 Pin 3
#panel.encoder_b_pin 3.26!^ # encoder pin ; GLCD EXP2 Pin 5
#panel.click_button_pin 1.30!^ # click button ; GLCD EXP1 Pin 2
#panel.buzz_pin 1.31 # pin for buzzer ; GLCD EXP1 Pin 1
#panel.button_pause_pin 2.11^ # kill/pause ; GLCD EXP2 Pin 8 either
#panel.back_button_pin 2.11!^ # back button ; GLCD EXP2 Pin 8 or
# pins used with other panels
#panel.up_button_pin 0.1! # up button if used
#panel.down_button_pin 0.0! # down button if used
#panel.click_button_pin 0.18! # click button if used
panel.menu_offset 0 # some panels will need 1 here
panel.alpha_jog_feedrate 1000 # x jogging feedrate in mm/min
panel.beta_jog_feedrate 1000 # y jogging feedrate in mm/min
panel.gamma_jog_feedrate 200 # z jogging feedrate in mm/min
panel.hotend_temperature 185 # temp to set hotend when preheat is selected
panel.bed_temperature 60 # temp to set bed when preheat is selected
# Example of a custom menu entry, which will show up in the Custom entry.
# NOTE _ gets converted to space in the menu and commands, | is used to separate multiple commands
custom_menu.power_on.enable true #
custom_menu.power_on.name Power_on #
custom_menu.power_on.command M80 #
custom_menu.power_off.enable true #
custom_menu.power_off.name Power_off #
custom_menu.power_off.command M81 #
# Only needed on a smoothieboard
currentcontrol_module_enable true #
return_error_on_unhandled_gcode false #
# network settings
network.enable true
# enable the ethernet network services
network.webserver.enable true # enable the webserver
network.telnet.enable true # enable the telnet server
#network.ip_address auto # use dhcp to get ip address
# uncomment the 3 below to manually setup ip address
network.ip_address 192.168.178.222 # the IP address
network.ip_mask 255.255.254.0 # the ip mask
network.ip_gateway 192.168.178.1 # the gateway address
#network.mac_override xx.xx.xx.xx.xx.xx # override the mac address, only do this if you have a conflict
Workflow
- Model (CAD)
- Fräsanweisungen (CAM)
- Erzeugen der Fräsanweisungen/Maschinenanweisungen mit einer CAM.
- Wir suchen noch nach einer brauchbaren Open-Source Lösung.
- CamBam (kommerziell, Windows): Es gibt eine ältere Mono Version für Linux. Die Demo schneidet nach 40 mal Starten Gcode ab.
- PyCAM (open source, plattformunabhängig): Sieht im Vergleich zu aktuellen kommerziellen Lösungen alt aus und ist bisweilen recht langsam.
- HeeksCAD (open source, Windows/Linux):
- Inventor HSM (kommerziell, Windows 64bit): Gibt für Studenten eine 3-Jahres Lizenz kostenlos, aber mit viel DRM.
- FlatCam Tool zur Generierung von Maschinencode für das CNC-Fräse/Isolationsfräsen.
- Simulation
- Eine Simulation der Fräsanweisungen kann bei Bedarf mit OpenSCAM durchgeführt werden
- Übertragen auf CNC-Controller Smoothieboard
- Per Dateiupload (Datenträger von Smoothieboard, SD-Karte)
- Koordinatensystem der Fräse setzen
- Fräsen
Parameter für verschiedene Werkstoffe
Parameter finden sich sind auf der Unterseite CNC-Fräse/Parameter
Steuern des Smoothieboards
- Per seriell Verbindung über Konsole "screen /dev/ttyACM0 115200", oder Pronterface GUI
- Per Netzwerkverbindung über Konsole mit Telnet, oder Http Web UI
- Mittlerweile existiert sogar eine Android App SmoothieControl
- bCNC ermöglicht das Senden von GCODE-Anweisungen und Visualisierung der Fräsbahnen in einer GUI.